Live Video

Showing posts with label Everyday Cricut. Show all posts

Wednesday, May 16, 2012

I'm Creative...Quilt!

Hi, Kendra here again with another fun idea for all those Artsy and Messy Crafters out there!
I will be first to admit that I am one of them...I am a very creative and very messy Scrapper/Quilter!
When I am in the groove, paper or fabric goes a flying!
I will finish a project and sometime have to shovel my way out of my space.
So if you are like me, just know you are not alone!  :-)


What could be more fun than creating yourself a wall hanging with my favorite Quote and Motto on it?

I'm creative, please tell me
neatness doesn't count!

HERE is the Cricut Craft Room file for this project
HERE is the Gypsy file for this project.
(Note:  I have not double checked the Gypsy file as my Gypsy is having technical difficulties talking to my computer.)


 For more details on how to make this wall hanging, head on over to Everyday Cricut.


This would make a great wall hanging for any craft room or as a gift.

What is your favorite quote you would like to see in a wall hanging?  I would love to hear them!  Who knows, I just might make one.  :-)

Be sure to come over to Everyday Cricut and Mixology Crafts to see more of my fun projects!


If you have not subscribed to my blog, please take a minute to do so.  I don't want you to miss out on any of the fun projects that I make!  :-)

Happy Scrappin'


Friday, December 10, 2010

Whimsically Wacky Wall Clock! Excellent Gift Idea!

I have had the best time Guest Designing here on Everyday Cricut for the last week! If you have not had a chance to subscribe to my blog be sure to take a moment right now and do so.  I hope that I have brought some homemade gift inspiration to you and have gotten your creative juices running!


With Christmas just around the corner, I decided to create a Whimsically Wacky Wall Clock for my youngest daughters room. I wanted it to be a one of a kind and very colorful. I used Birthday Bash as the Cricut Cartridge of choice and boy oh boy was I excited when I finished it! I made sure that the cardstock I was using matched her room perfectly and then just went to town creating! (Do forgive me for the glare on the clock. I used Liquid Laminate and the lights were reflecting terribly in all my photos.)

Believe it or not this clock from start to finish including Paint and Liquid Laminate Drying, Drilling the Wood and Cutting all the Characters only took 6 hours! Definately worth the time invested!

Let me show you how to make it!

Materials Needed:
Cricut Expression
Birthday Bash Cricut Cartridge
12x12 piece of 3/4 inch Plywood (I purchased mine in the wood section of Michaels)
Lead Free Soldiering Wire (I found this at Home Depot and it was the thicker gauge that was 1 pound.  The cost was around 25.00)
Wire Cutters
Gel Super Glue (I used Loctite)
1 Quart White Zinsser Paint Primer (This was way too much but it does not come any smaller)
Small Disposable Paint Roller
White Acrylic Paint
Drill
Drill bits:  One to match the wire diameter and one to match the shaft of your clock mechanism.
Ruler
1 Clock Mechanism 3/4 Shalf
1 Set Black Decocative Clock Hands
Hot Pink, Light Pink, Lime Green, Teal Blue, Light Teal Blue, Orange, Light Yellow, White and Black Cardstocks
Tombow Mono Aqua Liquid Adhesive Glue (It only takes a tiny amount!)
Beacon's Liquid Laminate
Paint Brush for Laminate
Large Wooden Dowel

Instructions:

Using a ruler, mark of the 6 inch marks on the sides of your board with a small dot.  Measure to the right and left 3 1/2 inches and put another small dot.  On the BACK of your project, draw lines to connect opposite dots to each other.  It will look like you have a 6 sided astrisk.  You want to now use the Drill with the bit that matches your wire to drill small holes in the sides of your wood drilling at the angle the lines were drawn.


Select the drill bit that matches your clock mechanism shaft and in the middle where all the lines intersect, drill a hole.

Prime the Wood using the Zinsser Primer and mini roller.  Set aside to dry.  Once dry, paint with a coat of White Acrylic Paint and set aside to dry.

Using the Cricut Expression, Click the Fit To Page button and with a sheet of Hot Pink Cardstock, select the Astrisk and cut it out.  Set it aside for the face of the clock.

Cut the following Animals and all their layers out using the Birthday Bash Cricut Cartridge:

#1  Squirrel at 5 inches

#2  Sheep at 5 inches

#3  Giraffe at 7 inches

#4  Ladybug at 5 inches

#5  Shark at 6 inches

#6  Armadilo at 4 inches

#7  Skunk at 5 inches

#8  Snake at 7 inches

#9  Fox at 5 inches

#10  Cow at 6 inches

#11  Octopus at 5.5 inches

#12  Dog at 5.5 inches

The Numbers were cut at 2 inches for numbers 11 an 12.


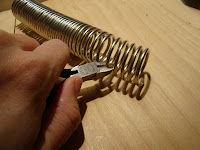
With the Soldering Wire, wrap the wire around a wooden dowel tightly.  Remove from the dowel and using wire cutters cut every 5th loop.  With pliers, shape a double loop at one end and a straight area at the other end.  The loop end will hold the character and the straight end will will be inserted into the drilled holes.

Being sure to protect your work surface, use Beacon's Liquid Laminate to cover both the front and back of your character.  Be sure to let it dry between coating the front and the back.  Let dry well.


Place your Large Hot Pink Astrisk in the middle of your clock face and using Liquid Laminate adhere it to the middle.  Let dry.  Once dry, poke the hole for your clock mechanism and insert according to the instructions.


While your characters are drying, use the Loctite Gel Super Glue insert a small dot in each hole inserting wire into the hole as you go.  Let dry.

Place each character using the looks like a paperclip in the appropriate spot. 

Watch your child's face light up when they see their clock for the first time!


Happy Scrappin'


Thursday, December 9, 2010

Reindeer Tea! A Wonderfully Simple and Yummy Gift Idea!

Complete Instructions will be posted by noon today!  Be sure to check back to get them.  I am having some problems with Mediafire and am trying to get the problems resolved!  Thanks for your understanding!  Merry Christmas!

I am still having problems with Mediafire so here are the instructions for the Reindeer tea.  If I can get the file to download, I will post the file you can just print off!  Until then...


Reindeer Tea Drink Mix
Ingredients:

• ¾ Cup Sweetened Instant Tea Mix
• 18 oz. Tang Drink Mix
• 1 Cup Sweetened Lemonade Mix
• 2 ¼ tsp. Ground Cinnamon
• ½ tsp. Ground Nutmeg
• 1 tsp. Ground Cloves
• 1 Bag Cinnamon Red Hots Candy

Directions:
1. In a large Bowl, mix together all ingredients except Cinnamon Red Hots.
2. Once the mixture is well blended, stir in the Cinnamon Red Hots.
3. Pour into clean dry canning jars and store at temperature.
4. To serve stir 1 ½ heaping teaspoons into and 8 oz mug of boiling water and enjoy!


It's beginning to feel a lot like Christmas here in the South!  We have been having hard frosts and I have been enjoying curling up with a good book and a mug yummy goodness...Reindeer Tea! I make dozens of bottles of it every year for my husbands employees and our friends.
Once you start making it on your own it is sure to become the start to a new holiday tradition in your family like it is in mine!


Happy Scrappin'


Wednesday, December 8, 2010

Sports Team Peace Lily Beta Vase Instructions!


It's Kendra here again with another Superb Christmas Idea for my
Guest Designing on Everyday Cricut!  
If you are not already a follow I would love for you to
take the time to become one so you don't miss out on anything! 
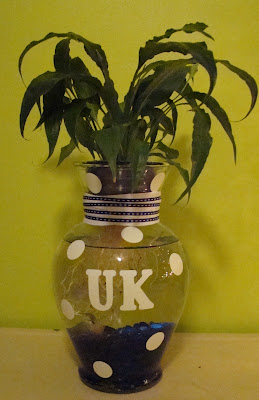
With Christmas knocking on our door I was trying to figure out what my son might like as a present in his University of Kentucky themed room and I remembered from about 14 years ago making the Peace Lily Beta Vases by the dozen and selling them. I almost could not make them fast enough. It seemed like everyone wanted one or two!

Forward 14 years in time to present day (no pun intended) and I can't think of a cuter dual purposed plant out there. How cool will it be for Abe to have a live plant to freshen and liven things up in his room and have a fish swimming around in the vase! He will completly flip when he see it on Christmas Day!


INSTRUCTIONS:

Materials Needed:
Beta Vase with Plastic insert
Rocks to match favorite sports team
1 Beta Fish
Small Peace Lily with dirt removed and rinsed well!
White Vinyl
Cricut
Base Camp Cricut Cartridge
Water with Stress Coat water conditioner
Ribbon to match sports team
Beta Food

Directions:
Rinse Vase and plastic insert. Put at least 2 inches of rocks at the bottom of the vase. Fill with room temp water and add appropriate amount of Stress Coat water conditioner. Acclimate the Beta fish to the water and transfer it to the new bowl. Cut a small hole in the plastic insert and thread the plant root through it being careful not to damage the. Fill the rest of the plastic insert with the matching stones. Place the plastic insert in the neck of the Vase.


Close up of the fish in the Vase.


Using the Cricut and the Base Camp Cricut Cartridge, cut out 1 inch circles and 2 inch lettering out of the white vinyl. Center the lettering and apply. Continue by applying the circles in a random fashion over the whole Vase.

Using White Twill, wrap the neck of the vase and tie in the ends in the back. Taking the blue fine ribbon, evenly space and wrap the ribbon finishing it off in the same fashion.

If you give one of these adorable Peace Lily Beta Vases this Christmas season make sure you also give food to go along with it. It is a myth that the Beta can live off the plant. They are carnivores and do not eat plants at all. They need to be fed about every other to every third day to survive. They also need a 25% water chance every week.

Happy Scrappin'


Tuesday, December 7, 2010

Sensational Snowman Shirt with Instructions!

As many of you know, I am Guest Designing over at Everyday Cricut this week!  I am creating wonderful homemade gift ideas all week long and you don't want to miss out! 
So be sure to head on over and check it out!
Sweet Snowman T-Shirt By Kendra Wiggins

Supplies:
Yudu Machine with New Screen Prepared with Emulsion
White Ink
Cricut Expression
The Snow Friends Cricut Cartridge
Heat-N-Bond Fusible Adhesive
Various Fabric Scraps
Black, White, Orange and Pink Cross Stitch Thread with needle
Scissors
Iron w/ Ironing Board

Directions:
1. Cut the Snowman out of Black at 10 inches


2. Lay prepared screen over the image.


3. Set a Heavy Object on the top of the Machine and Press the Expose button to burn the screen.


4. This is what the Burned image looks like.


5. Using Running water, Rinse the unexposed or green area away. I find it easier to use a hand on either side of the screen to help rub the emulsion away.


6. Flood the Screen by gently pulling the inks across the screen.


7. Using even pressure scrape the ink across the screen.


8. Lift Screen and check out your image. The snowman turned out just perfect!


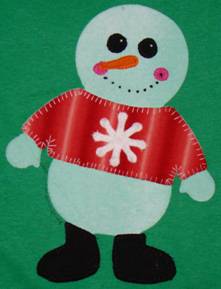
9. Cut the layers of the snowman at 10 inches. Using Steam-A-Seam, cut the layers out of paper and trace them. Select the desired colors of fabric for each layer. In this particular snowman, I did not use this eyes or mouth. Instead, I used the Cheeks as eyes and cut out smaller cheeks. I also make French Knots as the mouth and cut out a rounded carrot as the nose. The Shirt, Snowflake and shoes are all the original layers. Notice in the eyes, I put a small white French knot as the highlight. It is the small touches that will make people say WOW! Once you have your layers adhered, Blanket stitch around the edges to prevent fraying.


Happy Scrappin'