I have had the best time Guest Designing here on Everyday Cricut for the last week! If you have not had a chance to subscribe to my blog be sure to take a moment right now and do so. I hope that I have brought some homemade gift inspiration to you and have gotten your creative juices running!

With Christmas just around the corner, I decided to create a Whimsically Wacky Wall Clock for my youngest daughters room. I wanted it to be a one of a kind and very colorful. I used Birthday Bash as the Cricut Cartridge of choice and boy oh boy was I excited when I finished it! I made sure that the cardstock I was using matched her room perfectly and then just went to town creating! (Do forgive me for the glare on the clock. I used Liquid Laminate and the lights were reflecting terribly in all my photos.)
Believe it or not this clock from start to finish including Paint and Liquid Laminate Drying, Drilling the Wood and Cutting all the Characters only took 6 hours! Definately worth the time invested!
Let me show you how to make it!
Materials Needed:
Cricut Expression
Birthday Bash Cricut Cartridge
12x12 piece of 3/4 inch Plywood (I purchased mine in the wood section of Michaels)
Lead Free Soldiering Wire (I found this at Home Depot and it was the thicker gauge that was 1 pound. The cost was around 25.00)
Wire Cutters
Gel Super Glue (I used Loctite)
1 Quart White Zinsser Paint Primer (This was way too much but it does not come any smaller)
Small Disposable Paint Roller
White Acrylic Paint
Drill
Drill bits: One to match the wire diameter and one to match the shaft of your clock mechanism.
Ruler
1 Clock Mechanism 3/4 Shalf
1 Set Black Decocative Clock Hands
Hot Pink, Light Pink, Lime Green, Teal Blue, Light Teal Blue, Orange, Light Yellow, White and Black Cardstocks
Hot Pink, Light Pink, Lime Green, Teal Blue, Light Teal Blue, Orange, Light Yellow, White and Black Cardstocks
Tombow Mono Aqua Liquid Adhesive Glue (It only takes a tiny amount!)
Beacon's Liquid Laminate
Paint Brush for Laminate
Large Wooden Dowel
Instructions:
Using a ruler, mark of the 6 inch marks on the sides of your board with a small dot. Measure to the right and left 3 1/2 inches and put another small dot. On the BACK of your project, draw lines to connect opposite dots to each other. It will look like you have a 6 sided astrisk. You want to now use the Drill with the bit that matches your wire to drill small holes in the sides of your wood drilling at the angle the lines were drawn.
Select the drill bit that matches your clock mechanism shaft and in the middle where all the lines intersect, drill a hole.
Prime the Wood using the Zinsser Primer and mini roller. Set aside to dry. Once dry, paint with a coat of White Acrylic Paint and set aside to dry.
Using the Cricut Expression, Click the Fit To Page button and with a sheet of Hot Pink Cardstock, select the Astrisk and cut it out. Set it aside for the face of the clock.
Cut the following Animals and all their layers out using the Birthday Bash Cricut Cartridge:
#1 Squirrel at 5 inches
#2 Sheep at 5 inches
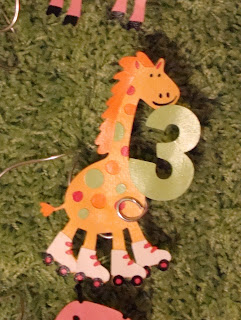
#3 Giraffe at 7 inches
#4 Ladybug at 5 inches
#5 Shark at 6 inches
#6 Armadilo at 4 inches
#7 Skunk at 5 inches
#8 Snake at 7 inches
#9 Fox at 5 inches
#10 Cow at 6 inches
#11 Octopus at 5.5 inches
#12 Dog at 5.5 inches
The Numbers were cut at 2 inches for numbers 11 an 12.


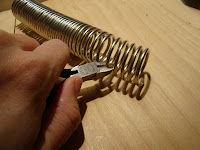
With the Soldering Wire, wrap the wire around a wooden dowel tightly. Remove from the dowel and using wire cutters cut every 5th loop. With pliers, shape a double loop at one end and a straight area at the other end. The loop end will hold the character and the straight end will will be inserted into the drilled holes.
Being sure to protect your work surface, use Beacon's Liquid Laminate to cover both the front and back of your character. Be sure to let it dry between coating the front and the back. Let dry well.
Place your Large Hot Pink Astrisk in the middle of your clock face and using Liquid Laminate adhere it to the middle. Let dry. Once dry, poke the hole for your clock mechanism and insert according to the instructions.


While your characters are drying, use the Loctite Gel Super Glue insert a small dot in each hole inserting wire into the hole as you go. Let dry.
Place each character using the looks like a paperclip in the appropriate spot.
Watch your child's face light up when they see their clock for the first time!
Happy Scrappin'


This comment has been removed by the author.
ReplyDeleteNow that is a masterpiece. What kid wouldn't love it. Thanks again for another great project.
ReplyDeleteThis is so cute, I have never seen anything like it. Gives me great ideas to make them for my boys...sports themed :)
ReplyDeleteThat is awesome. I really love it. i want to give it a try. Of course it won't happen until after Christmas and I'll have to get the cartridge but it will be worth it. Is that the cartridge with all the cute banners? I have been wanting to get one anyway.
ReplyDeleteThis turned out really cool! You done a fabulous job :)
ReplyDeleteyes - i have enjoyed your blog guest start projects on Everyday Cricut this week. the clock is so awesome. keep up the wonderful inspiration.
ReplyDeleteMaureen
Super, Super, Super cute!!! Did I say SUPER cute..hee hee This would be great for my 4 year old to learn time.. WOW, I just love it.. Great Job!!
ReplyDeleteNicole:)
What a wonderful addition to you daughter's room. It will be so much fun to tell time by.
ReplyDeleteThis is awesome! So unique and creative! Great job!!
ReplyDeleteI wish I were wacky enough to come up with an idea like this.
ReplyDeleteTFS! Shari . . .
This is sooo cute!
ReplyDeletethis has to be the cutest clock I have ever seen!!! Just curious why you used solder instead of wire - seems so expensive!
ReplyDeleteWhat a fun Clock! It must have been great fun to make, and will be greatly enjoyed.
ReplyDeleteCute, cute, cute! Thanks for sharing the instructions. Such a great gift idea.
ReplyDelete